|
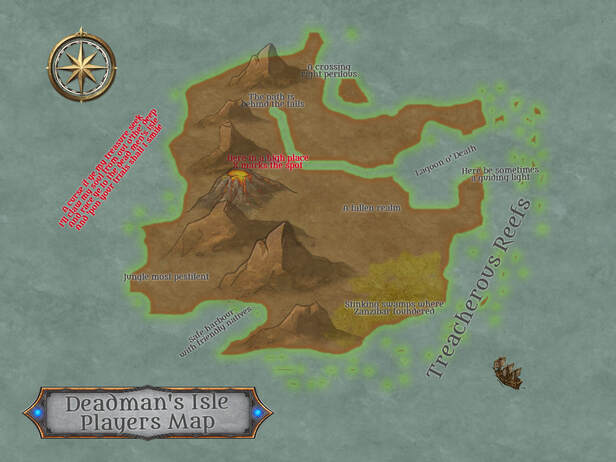
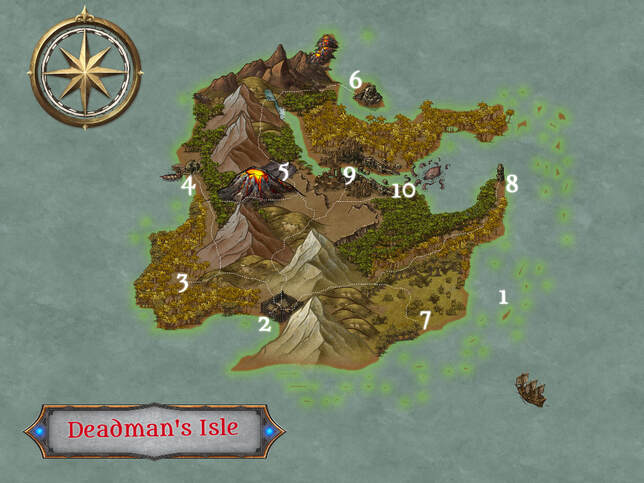
Return to Deadman's Isle is a 30-minute Dungeon Challenge, as set out by Tristan Tanner in his Bogeyman Blog. I hope it will inspire other people to create some of their own and send them to me - so I can hand out free copies of Forge Out Of Chaos as prizes in the January 2020 competition I used Tristan's optional tables to create an extra discipline for this 10-room dungeon: empty rooms that point to a combat, reveal history and offer something useful to PCs; the special room provides a boon for a sacrifice; the NPC is a rival; the combat encounters are a horde of weaklings, a pair of toughs and a tough boss; the traps are inconveniencing and incapacitating. As with The Crypt Bell Chimes, this took me 30 minutes to doodle and sketch out, but a couple more hours to type out nicely and create the maps. I added some detail while transcribing (like the exploration table in the Lost City and Redmayne's movements) so it's a bit of a 'cheat'. Background Elizar Redmayne is a pirate who discovers Deadman’s Isle when his ship, Zanzibar, founders on the reef. He is the only survivor, burying his wife, Captain Sheba, in the ruined city there. Redmayne befriends the weaselfolk and escapes the isle on one of Zanzibar’s boats. He eventually acquires a new ship, Unspoken Grief, and crew (including the PCs) but returns every year to the Isle to head into the interior alone to visit "his greatest treasure" (his wife’s grave, though no one knows this and his crew supposes he means his loot). Redmayne's grief makes him increasingly deranged and when he dies in a mutiny (see below), he returns as an undead Revenant (an intelligent Zombie) and travels to the Isle to protect his wife’s grave from the mutineers, enlisting his allies on the island. Hook Cap’n Redmayne’s tyranny went too far! His crew mutinied and took over the Unspoken Grief. Redmayne cursed the mutineers and jumped overboard to drown. His loyal First Mate Trethig and Bo’sun Jago were put to sea on a boat. Now the mutineers have a ship and Redmayne’s map, leading to Deadman’s Isle where Redmayne’s treasure lies buried,on the mysterious Deadman's Isle. Do you dare seize it for yourself? The Island Moving from one location to another takes 4 hours by trail. Sunset is at 8 and sunrise at 8. It is currently 8am so the PCs arrive at their first location at 12 noon. The island can only be safely approached at 2 and 4; reefs and cliffs make the rest of it inaccessible by sea. Night-time travel is not possible along mountain trails but torchlit travel between 7/8 and 9/10 is possible. Mosquitoes and heat means that sleep is only half effective (8 hours counts as 4, no restful healing). The Weather: On the second night a fierce storm blows in. No one gets any sleep. Vessels not in Weasel Bay (2) or Smugglers Cove (5) are dashed against the shore or reef and wrecked. Characters must swim for shore, probably abandoning armour and weapons. Locations 1. The Treacherous Reef If the PCs pilot the ship through the reef it will founder and come ashore at 7. Assume the rest of the crew die in the wreck. The PCs are unharmed but all rations are spoiled and they need another way off the island (but will find a ship's boat in the nearby wreck of Zanzibar). 2. Weasel Bay The ship can be safely anchored here and the PCs can come ashore by boat. NPC crew will be too frightened to venture ashore unless the Referee wants to assign NPC henchmen. A stockaded village of Jher-em (weasel-people) lies beyond the beach. The normally peaceful Jher-em have been incited by Redmayne’s Revent (see 9). There are 1d4 Weaselfolk per PC/NPC, plus an extra 1d4. Weaselfolk Jher-ems: (D&D) HD 1/2, HP 2, AC leather armour, attacks with daggers; (Forge) HP 9+1d6, DV1 2, DV2 1, padded armour AP 10, AR 0 or 2, attack with daggers or tails, ST 12+, SPD 3 The Jher-ems will issue from the stockade to attack the PCs on the beach, but will flee back once they take half losses. It may be possible to parlay with them from a position of strength. They have the following information:
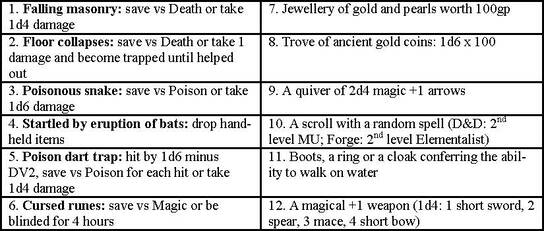
3. Quicksand This jungle trail ends in a clearing that is really quicksand. All PCs will become trapped unless they made a point of sending a scout ahead. Small/slender characters (Sprites/Halflings) can evade the sand. Everyone else sinks 1’ per round (half that rate for slender characters like Elves, Merikii, Dunnar; twice for stocky characters like Dwarves, Higmoni, Ghantu); those who go under start to drown. Trapped characters may Save vs Death to grab a vine or branch and try again each round at -2 cumulative penalty. They may then pull themselves out, taking 1HP damage per 1’ already submerged. Freed characters can pull others out using rope with no penalty. 4. The Vantage Point This rocky cliff gives a view along the volcanic gorge to 5 (the sailboat is visible), to the ruined temple on the island (6), to the Lost City (9) and the Lighthouse (8). From this vantage, two leaning towers at 9 form a clear X. Those who continue to search the lagoon (make a Search roll or 1 in 6) might detect the tentacles of the Sea Monster (10). Every round the volcano rains burning cinders, some of which detonate in fiery explosions. Characters who linger on the cliff must save vs Death or take 1d4 damage from a nearby explosion. Burning cinders litter the site. If they can somehow be carried (e.g. with the gloves from 6) they burn for 2d4 days and can be thrown as grenade-like weapons (2d4 damage on a hit, 1d4 on a miss). The PCs could catch up with Redmayne's Revenant here, at sunset on the first day when it arrives from 5 and stares out towards the X-symbol in the Lost City (9), heedless of the falling cinders. If approached, it steps of the ledge and vanishes from sight. 5. The Smuggler’s Cove A ruined port has a stone wharf that allows vessels to dock. Redmayne’s two lieutenants used this site as a secret smuggling base and rowed here after being cast adrift. They have set up a sail on the boat from their provisions here. A stone house of ancient construction is their hideout. They have stored 168gp, 1650sp, a storm lantern, 10 flasks of oil, tinder, 6 spears, a suit of man-sized plate armour, 4 portions of Healing Root (heals 1d4). (Forge: also 5 leather armour repair kits and 3 ring mail repair kits and a field repair case) Trethig: (D&D) 3rd level Fighter, 15HP, leather and shield, scimitar, +1 damage bonus; (Forge) 18HP, DV1 3, DV2 2, 20AP + 10SP, AV 3, ST 10+, SPD 4, scimitar, +1 damage bonus, Melee Assassination 2, Parrying, Tactics 55%, Hide 60%) Jago: (D&D) 3rd level Cleric, 10HP, leather, war hammer, bless & cause fear; (Forge) 16HP, DV1 2, DV2 2, 20AP, AV 2, ST 9+. SPD 2, mattock hammer, Grom Magic 2, 33SPTS (Enlarge: 15mins; Fear: 11mins, 20ft, ST -1; Grom’s Weapon 15mins; Proclaim 65%; Blood Lust 15mins; Shatter 70%, 15ft), Weapon Stomp 40%, Swimming Redmayne’s Revenant visits them at noon then departs eastward towards 4. Following his instructions, they set up a trap on their store house, dropping a heavy block for 1d8 damage on the first intruder through the door. They follow Redmayne to the Lost City (9) the next morning (taking the healing roots with them). If the PCs arrive before then, they will retreat into the house to take advantage of the trap. 6. Shrine & Rope Bridge The ancient shrine is atop a tall crag, a hundred yards from the cliffs along the coast. A rope bridge connects it (the PCs might sail past but cannot easily scale the cliffs). Crossing the bridge safely requires a Saving Throw vs Death or else the character falls into the sea (1d6 damage, may start to drown). Murals inside the shrine tell the story of a great city that was invaded by a sea monster, which blockaded the lagoon. Starved of trade and battered by the monster, the city fell into ruin. A magical fire burns in a brazier: it cannot be extinguished. Murals depict the fire being used to activate the Lighthouse (8), which is visible to the south-west through a window. The brazier can be carried on chains by any above-averagely strong (D&D: STR 13+; Forge: STR 9.0+) or larger than man-sized character and swung as a two-handed weapon, hitting every other melee round for 2d6 fire damage and causing 1d4 damage the following round. A pair of magical metal gloves beside the brazier allow the wearer to handle fire, e.g. pick up burning cinders at 4. If plunged into the magical flame, they ignite, allowing the wearer to punch for 1d6 damage each round and causing 1d3 damage the following round 7. The Wreck of Zanzibar In the tidal marshes, the wreck of Redmayne’s first ship can be found. The bones of the dead crew are weighted down with rocks. The Captain’s Log identifies ‘Sheba’ as the surviving captain and Redmayne as her husband and fellow survivor. The log ends with Sheba too sick to write and Redmayne away scouting a ruined city on the other side of the jungle; the final page is a heartfelt love letter to Redmayne, promising to be reunited with him when he crosses death's threshold. (NB Redmayne returned to find his wife dead and never discovered her final message) One of the ship’s boats is gone (Redmayne tookit when he escaped the island). Another survives intact and is mounted with a powerful harpoon cannon and 5 harpoons (two characters to aim and fire every other round, range 100ft, 2d10 damage). The boat can be rowed safely along the coast inside the reef. 8. The Lighthouse This 30’ tower stands on a windy crag. The steps are treacherous (1 in 6 chance for each character to slip, save vs Death to avoid falling into sea or else taking 2d6 damage hitting the ground). The brazier at the top is extinguished. It can be lit by the magical flame from 6 (transferring it from the brazier) or by one of the burning cinders from 4. If the lighthouse is lit, the Sea Monster will emerge from the Lagoon (10) and attack the tower and its occupants, trying to put out the light. If it attacks the Lighthouse, the Monster emerges fully from the water so its head can be attacked normally. It deals 10-60 structural points of damage to the tower each round after the first and when the tower takes 100 damage it collapses and explodes. Any characters still inside the tower die but the Monster’s Head takes 3d12 points of damage. 9. The Lost City & Sheba’s Grave The Lost City is a vast place and 4 hours spent exploring allows a roll on the table (1d12). Characters succeeding on a Search test/locate secret doors test roll 1d6+6 instead. After 4 hours searching, the PCs discover Sheba’s Grave, guarded by Redmayne’s Revenant. If the PCs are looking for the site under the X created by two leaning towers, they may find this immediately. If it is 4pm on the second day, Redmayne will be joined by Trethig and Jago (5). He directs them to set traps around the grave: roll 1d6 on the exploration table to determine which traps they create; they set up a trap at every sunset until the PCs arrive. Each round of combat, a random PC triggers one of the traps. Every round of noisy activity (combat, bat eruptions or trapped characters calling for help) has a 1 in 6 chance of attracting the Sea Monster (10) from the river. Redmayne does not fight but is indestructibly undead. He can be turned as a Vampire. If alone, he will summon the Sea Monster rather than allow Sheba’s grave to be desecrated (Trethig and Jago will side with the PCs against the Monster). If Redmayne is convinced the PCs do not intend to disinter his wife – or if presented with the lover letter from 7 – he will fade away harmlessly. 10. The Lagoon of Death The Sea Monster in the lagoon will emerge to attack anyone at this beach. The Monster has an unlimited number of tentacles but will direct 1d4 at each character. Tentacles: (D&D) HD 3, 10HP, AC as chain mail, 1d4 damage plus 1d6 constriction damage; (Forge) 10HP, AR 3, AV 3, lash for 1d4 then constrict for 1d6 actual each round, ST 15+, SPD 6 The tentacles can reach deep into the jungle (PCs must spend a full round fleeing before they are out of reach) or through the Lost City (9). A tentacle will release a victim and return to the water if it takes damage from fire. The Monster can only be truly harmed by attacking its head, which is in the water. The Monster will unleash an additional 1d4 tentacles against melee attackers in the water. Monster’s Head: (D&D) HD 9, 30HP, AC as leather armour, no attack; (Forge) HP 30, AR 2, ST 8+, SPD 1 Commentary This was an attempt to write a 'sandbox dungeon' within the constraints of the 30 Minute Dungeon Challenge. It's difficult to create a sandbox in 10 rooms, but it gets easier when the rooms are locations in a wilderness map. It's a strangely unoccupied wilderness map, by D&D standards. Really, there ought to be a wandering monster table and encounters in the jungles and the mountains - but heigh-ho, 30 minute challenge rather puts a stop to that sort of elaboration. Nonetheless, the players ought to be told they can see the long necks of dinosaurs in the distances, pterodactyls circling the peaks, the night-time roars of T-Rex in the mist, giant gorilla foot prints in the mud, that sort of thing. The scenario probably has the PCs disembarking at Weasel Bay, fighting then making peace with the Jher-em and following Redmayne's Revenant to Smuggler's Cove, where a trap is waiting for them. But it doesn't have to go down like that. They could disembark at the Cove just as Redmayne leaves it or get shipwrecked alongside the wreck of Zanzibar. Ideally, the climax occurs in the lost city, with the PCs confronting Redmayne and learning the true nature of his 'buried treasure' and then being attacked by the sea monster. Hopefully they confront and kill the monster. The optimal plan is to re-light the Lighthouse, allow the beast to injure itself tearing the tower down, then finish it off with the harpoon gun on Zanzibar's ship's boat. But knowing Player Characters, it'll work out completely differently!
0 Comments
Leave a Reply. |
30 Minute Dungeons
Essays on Forge
FORGE Reviews
OSR REVIEWS
White Box
THROUGH THE Hedgerow
Fen Orc
I'm a teacher and a writer and I love board games and RPGs. I got into D&D back in the '70s with Eric Holmes' 'Blue Book' set and I've started writing my own OSR-inspired games - as well as fantasy and supernatural fiction.. Archives
July 2024
Categories
All
|


 RSS Feed
