|
The Coney-Cliff Crypt is a 30-minute Dungeon Challenge, as set out by Tristan Tanner in his Bogeyman Blog. It was submitted by Karl McMichael who wins a copy of Forge Out Of Chaos as his prize in the January 2020 competition. 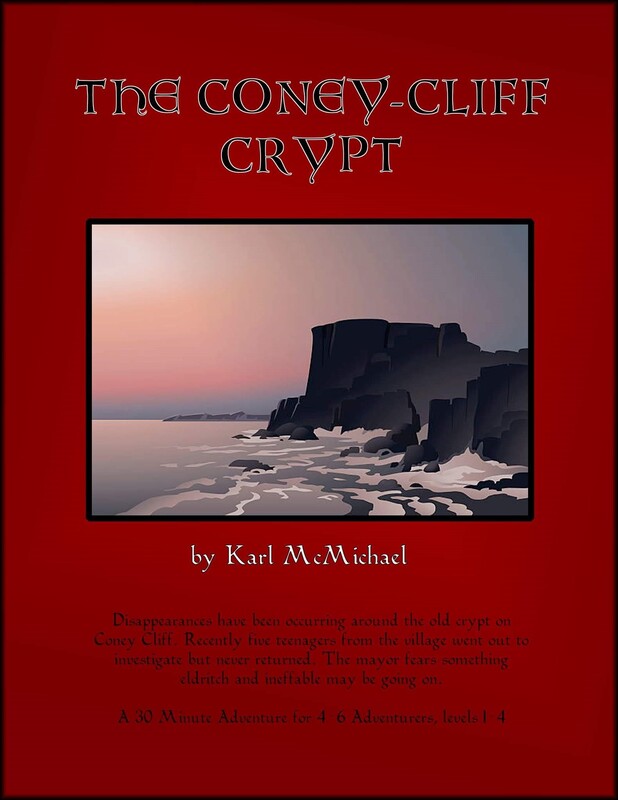 Thanks to Andrew Cook for the stylish cover Karl submitted the dungeon with references to D&D 5e; I've added a few conversions to Holmes/BX/AD&D and I'll adapt the whole scenario to Forge Out of Chaos next month. Andrew Cook has created a printable version of the scenario. I've adapted (and slightly expanded) the scenario for Forge Out of Chaos.
BackgroundA Necromancer has enslaved a tribe of Kobolds, insisting he can raise the skeleton of a dragon with human bones and sacrificial ritual. To this end, the Kobolds have been luring local villagers into nefarious traps then turning them over to the Necromancer. An adventurous gang of local teens have entered the dungeon and (mostly) been killed or captured. The Hook Disappearances have been occurring around the old crypt on Coney Cliff: recently five teenagers from the village went out to investigate but never returned. They are Devonna (gentlewoman), Tad (woodsman), Nedward (scribe), Hedrick (militiaman) and Genelle (rogue). The mayor fears something eldritch and ineffable may be going on. You have been sent to retrieve the disappeared youngsters or bring back their bodies. Rumours (1d8)
Coney Cliff is a windy rise well above the sea. As the wind howls in from the sea, faint cries and wails can indeed be heard on the wind. A tumbledown dry stone wall surrounds weather-beaten grave stones and tombs. A grand-looking crypt entrance stands most prominent: it is ornately carved with rusted iron gates open leading downward. However, the stone doors a few steps down but are stuck fast. Inscribed above the entrance reads: ‘Honour, oath and promise, here lay my briar brothers.' Dotted around the ground are dozens of rabbit burrows, several of which upon closer inspection contain jewellery, coins or semi-precious baubles (these are traps: see area 2). To the east of the Crypt Entrance lies a well (1); if the party look down inside they will see the flickering of a torch and hear a voice from below asking for help. 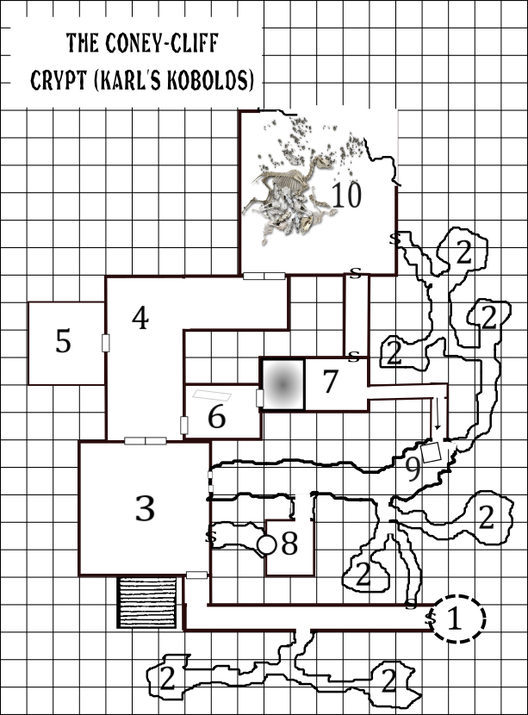 Each square is 5 feet 1. The Well The Well has only 2' of rope attached to the winch. It descends 30' into water that is 5' deep. Five feet above the water, several bricks have been removed (a secret door) and the area around the bottom of the well has been roughly excavated; some buckets and broken tools lie strewn about. There is a young man trapped down here with a dying torch; Nedward is thankful somebody arrived to help him as the rope he climbed down on snapped. He will tell the PCs a confusing tale of how he came here with his four friends: “Genelle disappeared before we came down. We tried the crypt door but it’s stuck fast, so we came down here when we saw the light. We went down the corridor beyond those bricks, but there was this shrieking thing! Lucky Devonna brought a sword and Tad borrowed a wood axe. They chopped it all up, my ears are still ringing though. They went through the door but there was a skeleton! Hedrick and I ran to get help, but when I got back Hedrick was gone! I’m no warrior, and I’m not brave. I guess dad was right, I’m only good for running and reading.” Nedward will attempt to leave, but might be persuaded to help if PCs leverage his insecurity about his father. He is a 3HP normal human with no armour or weapon but carries 5 torches and a tinder box. At area 4, he might give them a clue for the door: “It wants your word, some sort of promise.” Along the corridor is a secret door leading to a tight passage (where Hedrick was abducted); if it is discovered the Kobolds beyond will retreat to room 10. At the end of the corridor is a shoddy door, badly hung. In front of the door is a giant purple fungus, hacked apart by Nedward’s friends. 2. The Rabbit-holes/Kobold traps These small caves are linked by tight corridors. Creatures taller than Dwarves fight at -2 in the tunnels; those larger than Kobolds or Gnomes must travel and fight single file and cannot use shields; no one can use two-handed weapons. Kobolds can fight two abreast in the tunnels. In each of the numbered locations are 2 Kobolds, 14 in total (MM pg.195, 1 spear armed, 1 with javelin and club). They act as teams to capture those who reach for the trinkets in the rabbit holes at dawn and dusk. For Holmes/BX/AD&D, each Kobold has 2HP and deals 1d4 damage. Each hole has a snare that one Kobold tightens round the victim’s wrist as they reach in. They pull together to drag the victim into the crypt. They will bash the victim repeatedly until compliant or unconscious and bind them in room 10. If this fails, the spearman will finish the job and drag the body to room 10. Each group of Kobolds reacts intelligently: follow and ambush intruders, seek other Kobolds to gang up, attack intruders immediately, play dead, fake calls for help, self preserve and stay still or surrender and lure the PCs into a trap (e.g. room 5). Their motivation is to protect or misdirect intruders away from room 10. 3. Tribute Room (15' high) The room is covered in murals (a good amount may be covered by soot) which depict heroic deeds and figures in full plate with bramble motifs battling demons and defeating a giant dragon. There is a staircase that would lead up to the Crypt Entrance but the ceiling has collapsed, making it impassible. On the east wall, several bricks have been removed and bare soil is clearly visible: this is the secret door to area 8. The door in the North wall is carved with the same phrase in multiple languages: ‘I strive to keep order, to fight chaos and uphold the integrity of the Briar Knights.’ There are 2 skeletons (MM pg. 272) in this room which will rush to close the door in the south wall if they can and attack if not. For Holmes/BX/AD&D, each Skeleton has 4HP and deals 1d6 damage. In the centre of the room is a 5' wide copper bowl full of pitch. There are two arrow slits are located 12' above the floor on the east wall. Two Kobolds fire at any who enter room 3 with light crossbows for 3 rounds (targeting the least armoured character, including the boy Nedward from area 1). During the second round of combat, a Kobold from the arrow slit will fire a burning brand into the copper bowl igniting it and causing the room to fill with thick black smoke: 1’ after 1 round, 3’ after 2, 5’ after 3, 6’ after 4, 10’ after 6' and after 9 rounds the room will have 14' of smoke (it will stay at 10' if any doors are open) and the fire will die out. 4. Hallway of Oath There is a door to the east (room 5) which reads: ‘Here we lie.’ Daubed across it in thick red paint is a draconic script which reads: ‘CORPSE STORE. DANGER.’ NOTE: A Kobold group stalking the party may wish to open room 5 and unleash the Zombies if the PCs are looking too healthy. The door to the east (room 6) reads ‘ Here we are remembered.’ As the players proceed along the hall, they hear a female voice: ‘I am to join you Tad, they've come to finish me off.' Around the corner are two figures: a young man slumped against the wall, a woman hunched clutching her thigh with one hand and brandishing a sword with the other. The dead figure is Tad, a quarrel is protruding from his chest. The young woman is Devonna. A dead Kobold lies at her feet. She is in poor shape and laments her foolishness. She will do what the party asks of her but is in no shape to fight. The door to the north is heavily carved and inlaid with silver. It depicts a figure in plate armour with an ornate helmet crowned wìth thorns. It has a banner across both doors. It reads: ‘If you are to keep this, you must first give it to me.' The answer is oath/word; the specific oath is carved all over the door in room 3 in multiple languages and the correct response is: ‘I strive to keep order, to fight chaos and uphold the integrity of the Briar Knights.’ Upon receiving the correct answer, the door will open. The door may be picked, but unless the lockpicker criticals (or succeeds on two successive rolls for Holmes/BX/AD&D), a tiny hammer will fall on the lockpick, breaking it before resetting the lock in the door. 5. Zombie Room A room with open and smashed sarcophagi. The room is packed with 8 zombies (MM pg. 316). For Holmes/BX/AD&D, each Zombie has 8HP and deals 1d6 damage. Unless the door is closed quickly, the Zombies will spill into the corridor and attack anyone they come across. The zombies are Briar Knights raised by the Necromancer and instructed to attack intruders in preference to Kobolds. 6. Timber Room This room contains nothing apart from wormwood ridden timbers. Two are long enough to cross the pit in room 7 but one (50% chance it is the one the PCs use) is rotten and will break if any creature heavier than a Halfling walks across. A door leads east. It is of poor quality and fitting but it is locked. The lock is not a difficult check, but using force to break it down results in momentum carrying the PCs into the pit in room 7. 7. Spiked Pit A spike pit covers the west side of the room; there is a 10' drop into spikes covered in excrement and urine (DMG pg. 123). This is also a toilet as well as a trap. For Holmes/BX/AD&D, falling into the pit deals 1d6 damage and the character must Save vs Poison or take 1d4 damage and contract a disease (similar to Giant Rats). NOTE: this could be a great place to ambush PCs with one or more Kobold groups. There is a secret door to room 10 on the north wall. A tight slope leads up to room 9, climbing 10' (PHB pg. 192). If the Kobolds in area 8/9 are still active, the PCs will hear cries of help from room 9 (this is a trap). 8. Secret Ladder Entry The corridor terminates in a ladder which scales 10' up into room 9. If PCs find the secret door and enter here, the 2 Kobolds firing through into room 3 will come here to attack when a PC is at the bottom of the ladder. One will douse the intruder with a bucket of oil, the second will throw a burning brand down after it, setting the oil on fire. Once a PC reaches the top of the ladder, the Kobolds will do the bucket trick again on anyone else climbing up. The Kobolds will then summon two of the groups near them to join the fight and send the third to room 10. 9. Kobold Barracks (9' high) The earthen tunnel is full of rags, clothes, miscellaneous bones, boots and whatever the Kobolds took from commoners. On a crude dais in an alcove is an articulated wooden dragon toy surrounded by gems and gold coins. Leaned against it is a +1 magic warhammer with etched brambles along the head, a wand of magic missiles with 1d12 charges and 2 healing potions are also nestled in the pile. If players entered through area 8, there will be no fight. There is a caged mastiff by the slope to area 7. It is starved, blood thirsty and rages wildly when it sees the PCs. If the players enter through area 7 (perhaps answering the fake ‘cries for help’), the 2 Kobolds keeping watch on room 3/8 will drag the caged mastiff (MM pg. 332) over to the slope and lift the door of the crate to release the brute. They will then do the same as in area 8, using only 1 oil bucket to send a pool of burning oil down the slope. For Holmes/BX/AD&D, the Mastiff is HD 2, 8HP, AC 7, bite for 1d4+1. A young woman is bound tightly in the corner by the cage; her name is Genelle. She cries for help and to be cut free. She explains how she saw some fairy gold in a rabbit hole and was pulled underground, beaten and tied. Genelle is a 1st level Rogue/Thief (HP 3) and knows the route to room 10 through the Kobold tunnels and the secret door: she was taken there by the Kobolds and witnessed Hedrick being murdered but the Necromancer sent her back to the barracks to ‘amuse’ his servants. Genelle will agree to aid the party but will run away as soon as the Undead Dragon animates. 10. Necromancer's Lair & Dragon Grave The party disturb the Necromancer (and any Kobolds that fled to the room). There is a gaping 20' wide scar carved through the cliff face; it looks out over a tumultuous sea. Wind whips in through the hole, billowing the robes of a dark figure. There is a large skeletal dragon stretched upon a mountain of treasure. The ancient bones and mound of treasure is stained with strange patterns and sigils in deep red. The metallic smell in the air is overpowering as well as the stench of decay. Piled inside the rib cage of the dragon are corpses in varying degrees of decomposition; one is very fresh (this is Hedrick, one of the missing teenagers). Along the West wall is a lean-to with a bed roll surrounded by books and scrolls. A fire rages in the centre of the room. The Necromancer slashes his hand and places it on the forehead of the great skeletal beast. He says: ‘You called me mad.’ The dragon begins to shudder, limbs snapping magnetically into place. ‘Untalented.’ The dragon pulls itself upright on its forelegs ‘But I’ve done what you never could’ The dragon shoots forward on forelimbs; it is lame, dragging the back legs and pelvis uselessly. The Necromancer slumps exhausted, enamoured with his creation. He ignores the PCs. He will not interact or react to the PCs and will mutter and mumble to himself regardless of outcome. The Dragon’s stats are noted below. The treasure is left to the DM’s imagination. Frail Skeletal Dragon (5e) Large undead, lawful evil AC 15, HP 65, Speed 20' Str 16 (+3), Dex 8 (-1), Con 16 (+3), Int 8 (-1), Wis 10(0), Cha 10 (0) Saving throws : Dex +2, Wis +3 Languages: Draconic; Skills: perception +2 Damage vulnerability: bludgeoning; Damage resistance: neurotic; Damage immunity: poison; Condition immunity: poison, exhaustion Senses: blindsight 10', darkvision 60', passive perception 12 ABILITIES Noxious odour. Any creature within 5’ must make a DC 12 Con saving throw. On a failed save the creature is poisoned for the next minute. A creature poisoned in this way can repeat the saving throw at the end of its turn. ACTIONS Multiattack. This creature may make 2 attacks per round. Bite/breath weapon and claw. Bite. Melee attack. +4 to hit. 5' reach. Single target. (1D10 +3) piercing. Claw. Melee attack. +4 to hit. 5' reach. Single target. (2D4+3) slashing. Breath weapon (recharge 5-6) bone shards: 15’ cone. DC12 Dex saving throw. 5D6 damage on a failed save or half as much on a success. Skeletal Dragon (Holmes/BX/AD&D) AC 4, HD 5, HP 25, 2 claws & bite for 1d3/1d3/2d6, bone shards breath weapon in a line to 40', cannot be subdued but may be turned as a Spectre, treat as undead, nauseating odour the same as Troglodytes Commentary Karl has invited me to write a commentary on his scenario, which I'm delighted to do. Karl took his inspiration for this from Tucker's Kobolds. Back in 1987, Roger E. Moore wrote a famous editorial for Dragon #127 in which he described a dungeon adventure where a tribe of kobolds (the weakest of the D&D humanoid monsters) were deployed so cleverly they posed a significant challenge for even high level (6th-12th) adventurers. "Sometimes," Moore concludes, "it's the little things—used well—that count." Karl places his 16 Kobolds where they might capture some incurious PCs immediately, by dragging them through fake rabbit holes into underground caves and knocking them unconscious. Once the fight moves into the dungeon, the Kobolds take advantage of cramped, low tunnels where they can gang up on their restricted opponents. The Kobolds make use of traps and advantageous positions to pepper the PCs with arrows, pour burning oil on them, unleash savage dogs on them and retreat from direct melee wherever possible. The PCs will be badly battered and probably will have lost party members when they arrive at the climactic showdown with the undead dragon, a fight which will finish them off unless they make use of surprise or are sensible enough to flee. This is a delightfully malevolent dungeon, designed to give the PCs terrible experiences at every turn. 1st level characters probably won't get very far at all: 2nd level characters might be hardy enough to live to run away at the end. Set against this punishing experience are two mutually-reinforcing themes. One is the Crypt's original function, as the resting place of a noble order of nature-themed paladins. There are touches of beauty down here, in the bramble-motifs in the Tribute Room, in the dignified oaths and high-minded solution to the riddle on the doors. This was not always a terrible place, but it has been despoiled and corrupted. The PCs should be inspired to salvage what goodness and hope can be found down here, which leads to the second theme... The other theme is the rescue of the five teenage wannabe heroes. These characters are like the cast of a Hollywood horror movie who stumbled into a Very Bad Place: Hedrick and Tad are now dead, but the PCs can rescue Nedward, Genelle and Devonna and need to remember that this is in fact their mission. If they can bring all three youngsters alive out of the dungeon, they should feel rightly proud of themselves. Confronting the Dragon is pure hubris. If you referee this scenario, you might feel differently and want the PCs to have a fighting chance against the Dragon. You could rule that, if the Necromancer is assassinated, the skeletal dragon-thing collapses in ruins. More interesting is to emphasise its weakness: it has no mobility and cannot turn around, so PCs attacking from behind should enjoy Thief-like backstabbing advantages and Thieves themselves should inflict even more damage (triple, if you use Holmes/BX/AD&D). This heroic ending rather detracts from Karl's dramatic intention, but some player-groups prefer to win like heroic fools rather than flee and live like wise tacticians.
2 Comments
Greg long
3/3/2020 06:00:04 pm
Very interesting adventure. Just 2 things, there are no stats given for the necromancer and one of the notes in the commentary says that if the dragon is to powerful, maybe destroy it by taking out the necromancer. In room 10 description says a mound of treasure yet there is no treasure listed. Is this to be determined by the dm or maybe am illusion or fake coins (gold painted lead coins). Been playing since 1978 and I always enjoy a good adventure.
Fen Orc
3/3/2020 06:25:33 pm
Karl's intention is that, once the Necromancer animates the Dragon, he collapses and is no further threat. My suggestion is that, if the PCs assassinate him while he's helpless, that might deactivate the Dragon - but would ethical PCs do such a thing? I think the treasure is left to the DM's imagination but PCs who overcome this beast (after surviving the dungeon) deserve a massive reward. Really, though, they should flee: their mission is to find out what happened to the teenagers and, with Hedrick's body located, they should have discharged this duty. Leave a Reply. |
30 Minute Dungeons
Essays on Forge
FORGE Reviews
OSR REVIEWS
White Box
THROUGH THE Hedgerow

Fen Orc
I'm a teacher and a writer and I love board games and RPGs. I got into D&D back in the '70s with Eric Holmes' 'Blue Book' set and I've started writing my own OSR-inspired games - as well as fantasy and supernatural fiction.. 


Archives
July 2024
Categories
All
|
||||||

 RSS Feed
