|
Return to Deadman's Isle is a 30-minute Dungeon Challenge, as set out by Tristan Tanner in his Bogeyman Blog. I hope it will inspire other people to create some of their own and send them to me - so I can hand out free copies of Forge Out Of Chaos as prizes in the January 2020 competition I used Tristan's optional tables to create an extra discipline for this 10-room dungeon: empty rooms that point to a combat, reveal history and offer something useful to PCs; the special room provides a boon for a sacrifice; the NPC is a rival; the combat encounters are a horde of weaklings, a pair of toughs and a tough boss; the traps are inconveniencing and incapacitating. As with The Crypt Bell Chimes, this took me 30 minutes to doodle and sketch out, but a couple more hours to type out nicely and create the maps. I added some detail while transcribing (like the exploration table in the Lost City and Redmayne's movements) so it's a bit of a 'cheat'. Background Elizar Redmayne is a pirate who discovers Deadman’s Isle when his ship, Zanzibar, founders on the reef. He is the only survivor, burying his wife, Captain Sheba, in the ruined city there. Redmayne befriends the weaselfolk and escapes the isle on one of Zanzibar’s boats. He eventually acquires a new ship, Unspoken Grief, and crew (including the PCs) but returns every year to the Isle to head into the interior alone to visit "his greatest treasure" (his wife’s grave, though no one knows this and his crew supposes he means his loot). Redmayne's grief makes him increasingly deranged and when he dies in a mutiny (see below), he returns as an undead Revenant (an intelligent Zombie) and travels to the Isle to protect his wife’s grave from the mutineers, enlisting his allies on the island. Hook Cap’n Redmayne’s tyranny went too far! His crew mutinied and took over the Unspoken Grief. Redmayne cursed the mutineers and jumped overboard to drown. His loyal First Mate Trethig and Bo’sun Jago were put to sea on a boat. Now the mutineers have a ship and Redmayne’s map, leading to Deadman’s Isle where Redmayne’s treasure lies buried,on the mysterious Deadman's Isle. Do you dare seize it for yourself? 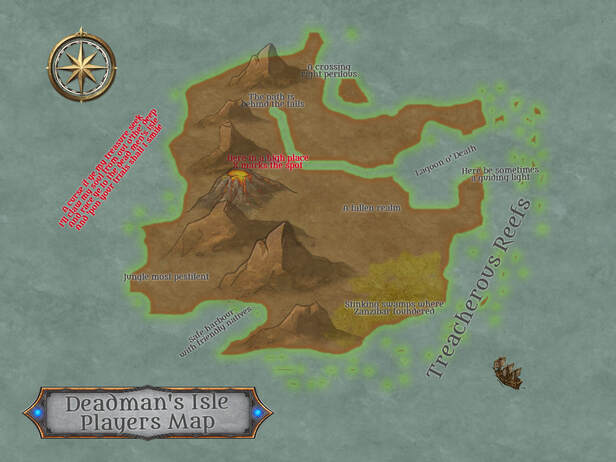 The Island Moving from one location to another takes 4 hours by trail. Sunset is at 8 and sunrise at 8. It is currently 8am so the PCs arrive at their first location at 12 noon. The island can only be safely approached at 2 and 4; reefs and cliffs make the rest of it inaccessible by sea. Night-time travel is not possible along mountain trails but torchlit travel between 7/8 and 9/10 is possible. Mosquitoes and heat means that sleep is only half effective (8 hours counts as 4, no restful healing). The Weather: On the second night a fierce storm blows in. No one gets any sleep. Vessels not in Weasel Bay (2) or Smugglers Cove (5) are dashed against the shore or reef and wrecked. Characters must swim for shore, probably abandoning armour and weapons. 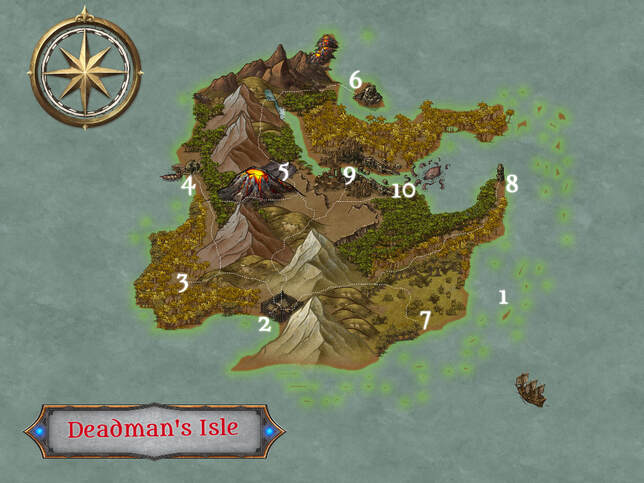 Locations 1. The Treacherous Reef If the PCs pilot the ship through the reef it will founder and come ashore at 7. Assume the rest of the crew die in the wreck. The PCs are unharmed but all rations are spoiled and they need another way off the island (but will find a ship's boat in the nearby wreck of Zanzibar). 2. Weasel Bay The ship can be safely anchored here and the PCs can come ashore by boat. NPC crew will be too frightened to venture ashore unless the Referee wants to assign NPC henchmen. A stockaded village of Jher-em (weasel-people) lies beyond the beach. The normally peaceful Jher-em have been incited by Redmayne’s Revent (see 9). There are 1d4 Weaselfolk per PC/NPC, plus an extra 1d4. Weaselfolk Jher-ems: (D&D) HD 1/2, HP 2, AC leather armour, attacks with daggers; (Forge) HP 9+1d6, DV1 2, DV2 1, padded armour AP 10, AR 0 or 2, attack with daggers or tails, ST 12+, SPD 3 The Jher-ems will issue from the stockade to attack the PCs on the beach, but will flee back once they take half losses. It may be possible to parlay with them from a position of strength. They have the following information:
3. Quicksand This jungle trail ends in a clearing that is really quicksand. All PCs will become trapped unless they made a point of sending a scout ahead. Small/slender characters (Sprites/Halflings) can evade the sand. Everyone else sinks 1’ per round (half that rate for slender characters like Elves, Merikii, Dunnar; twice for stocky characters like Dwarves, Higmoni, Ghantu); those who go under start to drown. Trapped characters may Save vs Death to grab a vine or branch and try again each round at -2 cumulative penalty. They may then pull themselves out, taking 1HP damage per 1’ already submerged. Freed characters can pull others out using rope with no penalty. 4. The Vantage Point This rocky cliff gives a view along the volcanic gorge to 5 (the sailboat is visible), to the ruined temple on the island (6), to the Lost City (9) and the Lighthouse (8). From this vantage, two leaning towers at 9 form a clear X. Those who continue to search the lagoon (make a Search roll or 1 in 6) might detect the tentacles of the Sea Monster (10). Every round the volcano rains burning cinders, some of which detonate in fiery explosions. Characters who linger on the cliff must save vs Death or take 1d4 damage from a nearby explosion. Burning cinders litter the site. If they can somehow be carried (e.g. with the gloves from 6) they burn for 2d4 days and can be thrown as grenade-like weapons (2d4 damage on a hit, 1d4 on a miss). The PCs could catch up with Redmayne's Revenant here, at sunset on the first day when it arrives from 5 and stares out towards the X-symbol in the Lost City (9), heedless of the falling cinders. If approached, it steps of the ledge and vanishes from sight. 5. The Smuggler’s Cove A ruined port has a stone wharf that allows vessels to dock. Redmayne’s two lieutenants used this site as a secret smuggling base and rowed here after being cast adrift. They have set up a sail on the boat from their provisions here. A stone house of ancient construction is their hideout. They have stored 168gp, 1650sp, a storm lantern, 10 flasks of oil, tinder, 6 spears, a suit of man-sized plate armour, 4 portions of Healing Root (heals 1d4). (Forge: also 5 leather armour repair kits and 3 ring mail repair kits and a field repair case) Trethig: (D&D) 3rd level Fighter, 15HP, leather and shield, scimitar, +1 damage bonus; (Forge) 18HP, DV1 3, DV2 2, 20AP + 10SP, AV 3, ST 10+, SPD 4, scimitar, +1 damage bonus, Melee Assassination 2, Parrying, Tactics 55%, Hide 60%) Jago: (D&D) 3rd level Cleric, 10HP, leather, war hammer, bless & cause fear; (Forge) 16HP, DV1 2, DV2 2, 20AP, AV 2, ST 9+. SPD 2, mattock hammer, Grom Magic 2, 33SPTS (Enlarge: 15mins; Fear: 11mins, 20ft, ST -1; Grom’s Weapon 15mins; Proclaim 65%; Blood Lust 15mins; Shatter 70%, 15ft), Weapon Stomp 40%, Swimming Redmayne’s Revenant visits them at noon then departs eastward towards 4. Following his instructions, they set up a trap on their store house, dropping a heavy block for 1d8 damage on the first intruder through the door. They follow Redmayne to the Lost City (9) the next morning (taking the healing roots with them). If the PCs arrive before then, they will retreat into the house to take advantage of the trap. 6. Shrine & Rope Bridge The ancient shrine is atop a tall crag, a hundred yards from the cliffs along the coast. A rope bridge connects it (the PCs might sail past but cannot easily scale the cliffs). Crossing the bridge safely requires a Saving Throw vs Death or else the character falls into the sea (1d6 damage, may start to drown). Murals inside the shrine tell the story of a great city that was invaded by a sea monster, which blockaded the lagoon. Starved of trade and battered by the monster, the city fell into ruin. A magical fire burns in a brazier: it cannot be extinguished. Murals depict the fire being used to activate the Lighthouse (8), which is visible to the south-west through a window. The brazier can be carried on chains by any above-averagely strong (D&D: STR 13+; Forge: STR 9.0+) or larger than man-sized character and swung as a two-handed weapon, hitting every other melee round for 2d6 fire damage and causing 1d4 damage the following round. A pair of magical metal gloves beside the brazier allow the wearer to handle fire, e.g. pick up burning cinders at 4. If plunged into the magical flame, they ignite, allowing the wearer to punch for 1d6 damage each round and causing 1d3 damage the following round 7. The Wreck of Zanzibar In the tidal marshes, the wreck of Redmayne’s first ship can be found. The bones of the dead crew are weighted down with rocks. The Captain’s Log identifies ‘Sheba’ as the surviving captain and Redmayne as her husband and fellow survivor. The log ends with Sheba too sick to write and Redmayne away scouting a ruined city on the other side of the jungle; the final page is a heartfelt love letter to Redmayne, promising to be reunited with him when he crosses death's threshold. (NB Redmayne returned to find his wife dead and never discovered her final message) One of the ship’s boats is gone (Redmayne tookit when he escaped the island). Another survives intact and is mounted with a powerful harpoon cannon and 5 harpoons (two characters to aim and fire every other round, range 100ft, 2d10 damage). The boat can be rowed safely along the coast inside the reef. 8. The Lighthouse This 30’ tower stands on a windy crag. The steps are treacherous (1 in 6 chance for each character to slip, save vs Death to avoid falling into sea or else taking 2d6 damage hitting the ground). The brazier at the top is extinguished. It can be lit by the magical flame from 6 (transferring it from the brazier) or by one of the burning cinders from 4. If the lighthouse is lit, the Sea Monster will emerge from the Lagoon (10) and attack the tower and its occupants, trying to put out the light. If it attacks the Lighthouse, the Monster emerges fully from the water so its head can be attacked normally. It deals 10-60 structural points of damage to the tower each round after the first and when the tower takes 100 damage it collapses and explodes. Any characters still inside the tower die but the Monster’s Head takes 3d12 points of damage. 9. The Lost City & Sheba’s Grave The Lost City is a vast place and 4 hours spent exploring allows a roll on the table (1d12). Characters succeeding on a Search test/locate secret doors test roll 1d6+6 instead. 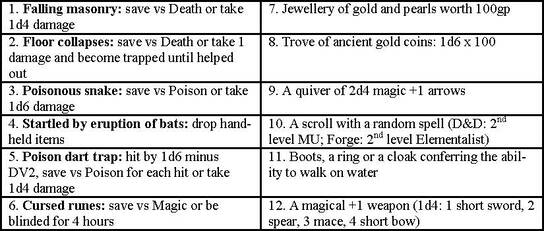 After 4 hours searching, the PCs discover Sheba’s Grave, guarded by Redmayne’s Revenant. If the PCs are looking for the site under the X created by two leaning towers, they may find this immediately. If it is 4pm on the second day, Redmayne will be joined by Trethig and Jago (5). He directs them to set traps around the grave: roll 1d6 on the exploration table to determine which traps they create; they set up a trap at every sunset until the PCs arrive. Each round of combat, a random PC triggers one of the traps. Every round of noisy activity (combat, bat eruptions or trapped characters calling for help) has a 1 in 6 chance of attracting the Sea Monster (10) from the river. Redmayne does not fight but is indestructibly undead. He can be turned as a Vampire. If alone, he will summon the Sea Monster rather than allow Sheba’s grave to be desecrated (Trethig and Jago will side with the PCs against the Monster). If Redmayne is convinced the PCs do not intend to disinter his wife – or if presented with the lover letter from 7 – he will fade away harmlessly. 10. The Lagoon of Death The Sea Monster in the lagoon will emerge to attack anyone at this beach. The Monster has an unlimited number of tentacles but will direct 1d4 at each character. Tentacles: (D&D) HD 3, 10HP, AC as chain mail, 1d4 damage plus 1d6 constriction damage; (Forge) 10HP, AR 3, AV 3, lash for 1d4 then constrict for 1d6 actual each round, ST 15+, SPD 6 The tentacles can reach deep into the jungle (PCs must spend a full round fleeing before they are out of reach) or through the Lost City (9). A tentacle will release a victim and return to the water if it takes damage from fire. The Monster can only be truly harmed by attacking its head, which is in the water. The Monster will unleash an additional 1d4 tentacles against melee attackers in the water. Monster’s Head: (D&D) HD 9, 30HP, AC as leather armour, no attack; (Forge) HP 30, AR 2, ST 8+, SPD 1 Commentary This was an attempt to write a 'sandbox dungeon' within the constraints of the 30 Minute Dungeon Challenge. It's difficult to create a sandbox in 10 rooms, but it gets easier when the rooms are locations in a wilderness map. It's a strangely unoccupied wilderness map, by D&D standards. Really, there ought to be a wandering monster table and encounters in the jungles and the mountains - but heigh-ho, 30 minute challenge rather puts a stop to that sort of elaboration. Nonetheless, the players ought to be told they can see the long necks of dinosaurs in the distances, pterodactyls circling the peaks, the night-time roars of T-Rex in the mist, giant gorilla foot prints in the mud, that sort of thing. The scenario probably has the PCs disembarking at Weasel Bay, fighting then making peace with the Jher-em and following Redmayne's Revenant to Smuggler's Cove, where a trap is waiting for them. But it doesn't have to go down like that. They could disembark at the Cove just as Redmayne leaves it or get shipwrecked alongside the wreck of Zanzibar. Ideally, the climax occurs in the lost city, with the PCs confronting Redmayne and learning the true nature of his 'buried treasure' and then being attacked by the sea monster. Hopefully they confront and kill the monster. The optimal plan is to re-light the Lighthouse, allow the beast to injure itself tearing the tower down, then finish it off with the harpoon gun on Zanzibar's ship's boat. But knowing Player Characters, it'll work out completely differently!
0 Comments
Last week I posted up a festive one-shot scenario on the Blog. It was my first attempt at a 30-minute dungeon and it was a dismal failure because it took me an hour and a half! But it was a cute tale of a dysfunctional peasant family being assaulted by malevolent winter spirits and the PCs being on hand to save them - a sort of reverse-dungeon where the PCs are defending a site and the monsters are the raiders. I took a bit of time to convert the scenario to Forge Out Of Chaos as part of my project to support this forgotten '90s heartbreaker. The finished scenario is on the Scenarios page. It encouraged me to correct a few mistakes. The scenario features principle NPCs Vadim and Vasilisa who are ordinary peasants but have special ancestors. My first draft was a bit confused about whether heroic Dadushka and witchy Babushka were the parents or grandparents. The final edit clarifies: they were grandparents to the three children and therefore parents to the married couple. This also clarifies a theme that was in my mind when composing the scenario but didn't get the sort of emphasis it needed. Vadim and Vasilisa have both turned their backs on the careers of their adventuresome parents: Vadim is no warrior fighting demons and Vasilisa is no witch safeguarding the home. They are the lesser children of greater parents; they live in a security their parents earned but which they themselves do not appreciate. Vadim doesn't even realise the awl and poker combine to make his father's magical spear Snowmaiden while Vasilisa uses her mother's wand as a distaff for spinning.
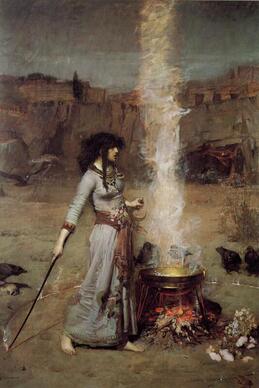
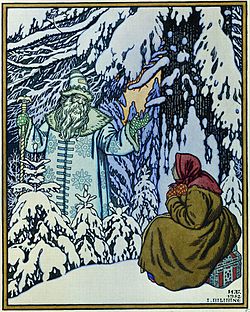
The other theme that I muddled on the first draft was the role of Morozko the beggar. I intended him to be an otherworldly figure, with his lunatic-savant babblings and his magical bag of gifts. The tattered robe of red and ermine hints at his true identity: Father Christmas.
The edit enabled me to clarify Morozko's role. Vasilisa turned him away when he came begging and this sin against the ancient code of hospitality is what triggers the family's harrowing. Morozko hides in the lumber shed, plotting revenge, but is discovered by little Nikita, who brings him food and drink. Morozko offers her a gift in return and takes her to the Kurgen - the old Howe where the winter spirits are imprisoned - and opens it. Nikita takes the snowglobe as her gift, but by doing so she unleashes Krampus and the Winterfiends. This might seem a pretty equivocal 'gift': isn't Morozko punishing the child who helped him to spite the mother who rejected him? In a way, yes, but faerie wisdom runs deeper than that. Morozko's gift to Nikita is to return her parents to her: not the unimpressive trapper and his superstitious wife, but the heroic role models that Vadim and Vasilisa can be, if they rise to the challenge of the Krampus. The snowglobe is an apt metaphor here, because Morozko is shaking the little cottage and its occupants, disturbing their peace and security, to bring out a greater beauty when the tumult settles. Of course, for this theme to come across clearly, the PCs' arrival should not be accidental. They meet Vasilisa while heading down a forest trail as night draws on, but how did they get to be there? Perhaps, earlier that day, at a fork in the road, they met an old man in blue and white who directs them down the left hand trail. This figure is Morozko, of course, and he has misdirected them - but only in order for them to pass by the stile where Vasilisa waits for heroes to come to her aid. 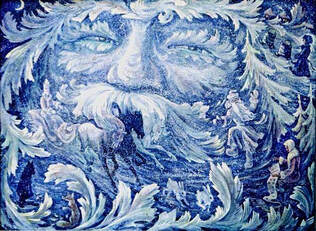 The revised version includes some advice for the Referee in roleplaying Morozko. He won't be attacked by monsters if there are any other targets. He can navigate the blizzard and part the Holly Hedge to rescue prisoners. He understands everything going on. But he appears to be a gibbering fool. He functions as a 'Referee's Friend' since his crackpot utterances can direct PCs towards vital goals (reading the spellbook, assembling the spear, matching the wand and ring, returning the snowglobe). Ultimately, he could be used as a deus ex machina to bring about a successful resolution, but that requires some inspired roleplaying to get Vasilisa to repent her hard-heartedness and the two adults to demonstrate their heroism to the sceptical winter god. How does it work with FORGE? Forge has some advantages over straightforward D&D in a scenario like this. Most classic fantasy RPGs are games of attrition: your health, spells and weapons get used up and, once they're exhausted, you've failed. Old school D&D suffers from the fact that the PCs have so very little to lose. This can make it hard to tell one of those 'night from hell' storylines where waves of attackers come at the PCs, whittling them down. Most 1st level D&D characters struggle to survive the first whittle! Forge offers characters armour to take the brunt of damage (at least, at first) and Spell Points (SPTS) to use and re-use spells. Then, after an encounter, Field Repair can be used to restore armour and Binding can restore Hit Points, so long as the repair kits hold out. This gives the PCs a bit more longevity in this sort of scenario, meaning the Referee can torment them more enthusiastically. This helps support a group of introductory Forge characters through a night with several bruising combat encounters. Converting the scenario means working with Forge's distinctive mechanics. There are materials in the cottage and the byre that can be used as armour repair kits and binding kits; there are extra healing roots among Vasilisa's stock. Mages can sleep to regain SPTS but, since they need to sleep for at least 2 hours, they will be lucky to get undisturbed rest. However, the spell book upstairs can recharge SPTS if it is opened to the right place. Krampus himself is a ghastly threat. He's modeled on the build for a troll (two claws for 1d8+5 each!) with the added bonus of 1d6 regeneration every round. That's too tough for starting characters, even with a fully-activated Snowmaiden canceling the regeneration. But if you end up fighting Krampus, you've probably failed the scenario. The players need to talk to the NPCs, learn about Vadim and Vasilisa's parents, figure out what Nikita stole from the howe and return it, hopefully with the aid of the Wand and Ring or the Spear to get through the Holly Hedge, but Morozko could be roped in to open the way if the Referee is feeling kind.
THE CRYPT BELL CHIMES is a 30-minute Dungeon Challenge, as set out by Tristan Tanner in his Bogeyman Blog. I hope it will inspire other people to create some of their own and send them to me - so I can hand out free copies of Forge Out Of Chaos as prizes in the January 2020 competition I used Tristan's optional tables to create an extra discipline for this 10-room dungeon: empty rooms that point to a combat, reveal history and offer something useful to PCs; the special room provides a boon for a sacrifice; the NPC is a rival; the combat encounters are a horde of weaklings, a pair of toughs and a tough boss; the trap is incapacitating. BACKGROUND The masked and hooded Lichkeepers preach that death is annihilation and undeath the only afterlife. They perform the rites of Animate Dead on corpses of the faithful and seal them away in tombs. The tombs are guarded and trapped to prevent the undead escaping. HOOK Ulurok the Unclean was a feared heretic. Now her crypt bells are ringing: the alarm means tomb robbers have entered the crypt. The Lichwardens send the PCs into the crypt to intercept the robbers before they can rouse Ulurok. The PCs are given a Lichkey - a 6" long iron key studded with gems - which can activate or deactivate traps inside the crypt. First, the key opens the gates to the underground tomb and a long tunnel stretches down into darkness, Each room is given a time that the PCs will spend in the room if they examine or interact with it fully. The keyhole symbols indicate points where the Lichkey can be used to interact with a location. 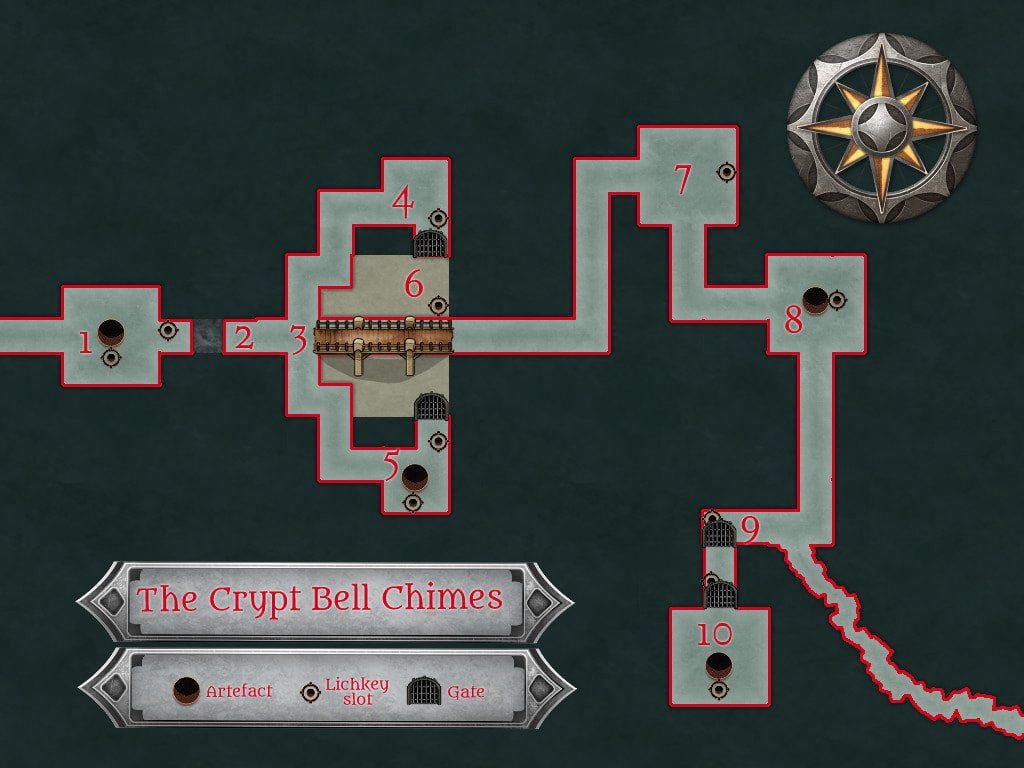 1. THE GUARDIAN GOLEM (5 mins) A 9' tall statue of an armoured reaper dominates the room.; it carries a scythe and am hourglass. It faces into the crypt. A key slot on the dais allows the Lichkey to 'lock' the golem so that it cannot activate. An inscription reads: "Here stand I / Scythe at the ready / Against heresy / And the unquiet dead." The Golem is 6HD, 30HP, AC as plate mail, attacks with scythe for 2d6 damage, unaffected by non-magical attacks. Above the passageway (2) is another inscription: "Ulurok the Unclean, twice cursed, twice buried, let none disturb her nor trust her lies." 2. THE PASSAGE OF TIME (15 mins or less) Hourglass symbols mark the entrance to this passage, which has a Lichkey slot in the wall to the right. An open pit blocks the corridor: it is 10' deep and there is a secret trapdoor in the E wall of the pit, about half way up. The pit is 10' across. Descending and climbing up the other side will take at least 15 minutes, 10 minutes if using Climbing skills or grappling hooks; using spikes and rope to cross along the wall might take 5 minutes but falling in causes 1d6 damage. Beyond the pit is a pit trap which opens onto a chute that deposits victims at the bottom of the pit; they are unharmed but need to climb out again. If a Lichkey is inserted in the slot it prevents the trap from activating so long as a key remains inserted. 3. BALCONY OF REGRETS (1 minute) From the balcony, the Bonevault (6) can be viewed, 20' below, where therre is a key slot to raise the bridge that will reach the exit in the opposite wall. PCs can descend directly (using rope) or take either stairway to the north or south. 4. THE KEY ROOM (5 minutes) Both entrances to 6 are blocked by mesh gates that must be torn or lifted (treat as portcullises). This room has the key slot that lifts both gates. There is a Lichkey inside it. If the LIchkey is removed, both gates open. Every minute there is a 50% chance 1d4 scarabs will enter this room or 5 if PCs are present. 5. THE SOUL-RIPPER (5 minutes) A 10' diameter mystical circle is engraved on the floor with a cage above it suspended from a chain. A Lichkey inserted in the key slot will lower the cage. A living being in the cage is converted into an undead zombie, albeit with some trace of their former identity (low intelligence, recognition of friends). This process takes 5 minutes. A zombified PC will be ignored by the scarabs in 6 but will activate the Golem in 1 if it tries to leave the dungeon. 6. THE BONEVAULT (1 minute + combat) Flesh-eating undead scarabs occupy this room, feeding on the corpses dropped through a chimney over 50' overhead. There is a keyslot that will raise the central section of the floor to create a bridge from 3 to the exit corridor. Scarabs are 1/2HD, 2HP, AC as chain mail, bite for 1 damage, they crawl inside armour so after a successful hit they make subsequent attacks against an unarmoured opponent; 1d3 scarabs attack each character and an additional 1d3 join the attack each round. The scarabs can be turned as Skeletons but new scarabs will keep coming. 7. THE LIBRARY OF THE HERESIARCH (1 minute + variable) Ulurok's heretical teachings are preserved here in a scrolls chained to the wall. The Lichkey can unlock all the chains if it is placed in the slot on the far wall, otherwise each scroll must be unlocked separately (taking 1 minute each attempt). There are 20 scrolls. The PCs can build up an impression of Ulurok's heresy by perusing several scrolls; it takes a PC 5 minutes to peruse one scroll, half that time if Intelligence is high (D&D: 13+):
8. THE SPIRIT CELL (5 minutes) A magic circle is set into the floor, inlaid with silver and gems. The spirit of Ulurok is trapped within. It is visible as a beautiful yet wasted woman, translucent, pleading yet inaudible. If Ulurok's spirit sees a Lichkey in the PCs' possession, she will gesture towards the key slot, begging to be freed. If a Lichkey is inserted in the keyslot in the floor, Ulurok's spirit is freed and will bless the PCs (each heals 1HP) and ask to be restored to her body 9. THE TUNNEL OF OBLIVION (variable) The tomb robbers have broken into this room through the north wall, pushing away the big stone blocks. An earthen tunnel beyond rises to the surface over the course of a mile. The two robbers, Chingiz and Qibilai (see below), are devotees of Ulurok who want to free her from her tomb so that her spirit can speak to her followers again. The final trapped tunnel has two vault doors but the robbers have no Lichkey to open them. It will take Chingiz 10 minutes to find each trap, 10 minutes to deactivate it and 10 minutes to open the lock: it takes the robbers 1 hour to enter Ulurok's tomb (10). The first door has a poison gas trap that fills the room with necrotizing gas: save vs Death or be turned into a Zombie (unintelligent, attacks other living characters). The second door fires darts: each character is hit by 1d6, dealing 1 damage each plus a save vs Poison or tun into a Zombie (as above). Each door has a keyslot and inserting a Lichkey deactivates and unlocks the door; removing the key relocks and re-traps it. There is no Lichkey slot on the inside of the doors. 10. ULUROK'S CRYPT A key slot in the wall will open the iron coffin, which contains a body swathed in chains. If Ulurok's spirit is here, it will renter her corpse restoring it to life. Otherwise, it is a dangerous undead Ghoul. If the tomb robbers get here ahead of the PCs, it will take them 10 minutes to open the coffin, whereupon the Ulurok-Ghoul attacks them. HD 4, HP 18, AC as chain mail, 2 claws for 1d4 each and a bite for 1d6, victims must Save Vs Poison or be paralysed Opening the coffin awakens the Golem (unless it has been deactivated) which makes its way through areas 2, 3, 6, 7, 8 and 9 to confront the awakened Ulurok here (taking 6 rounds). It will attack any characters it finds on the way. Ulurok's spirit can re-enter her body, breaking its undead curse. THE TOMB ROBBERS & ULUROK Chingiz and Qibilai will fight to the death against the minions of the Lichkeepers (i.e. the PCs) but might be persuaded to refrain by Ulurok's spirit, if she is free.
COMMENTARY
This took 30 minutes to scribble out but I couldn't resist embellishing when I typed out the final draft, so is that cheating? The scenario could play out very simply if the PCs race through the dungeon, ignoring the library and Ulurok's spirit, and intercept the tomb robbers before the open the tomb up. Chingiz and Qibilai can but up a tough fight (one can hide and backstab, the other is armoured and armed with a magic sword) but once they are dead the PCs can exit through the tunnel they created. Things get more interesting if the PCs read the heretical library or interact with Ulurok herself. If they realise that Ulurok is the heroine, not the villain, they might allow her coffin to be opened, but then they have to confront the Guardian Golem, a nasty foe. If they delay too long, the robbers will open the coffin, releasing a dangerous super-Ghoul and also activating the Golem, catching the PCs between two deadly opponents and making the release of Ulurok's spirit the only viable strategy.
Introduction The PCs are traveling down a winter trail, hoping for lodgings on the shortest day of the year, already drawing to an end, when a desperate woman accosts them at a stile. Her cottage, just a mile inside the woods, is under attack. Will brave adventurers help defend it from a terrible foe? The Referee needs to be familiar with the NPC family and their movements, the location and assembly of the Snowmaiden spear and the Witchhazel Wand, the role of the Zagorvor book and the random events that shape the night’s perils. The Cottage The cottage is home to Vadim and Vasilisa and their three children, teenage son Ivan, younger son Mikul and daughter Nikita. Last night a holy wreath was hammered to their door, a sign that the evil winter spirit Krampus has targeted their home for destruction. They expect Krampus to attack after sunset. PCs can examine and make preparations in one room each before the sun sets. Vadim will gather his family in the Hearth (A) and won’t agree to moving to other rooms. The Woods Outside the cottage a trail leads deeper into the woods, rising to a bald hill overlooking the farm. PCs will barely have time to explore the trail as far as the Holly Hedge (J) before gathering darkness and more snow forces them back to the Cottage. 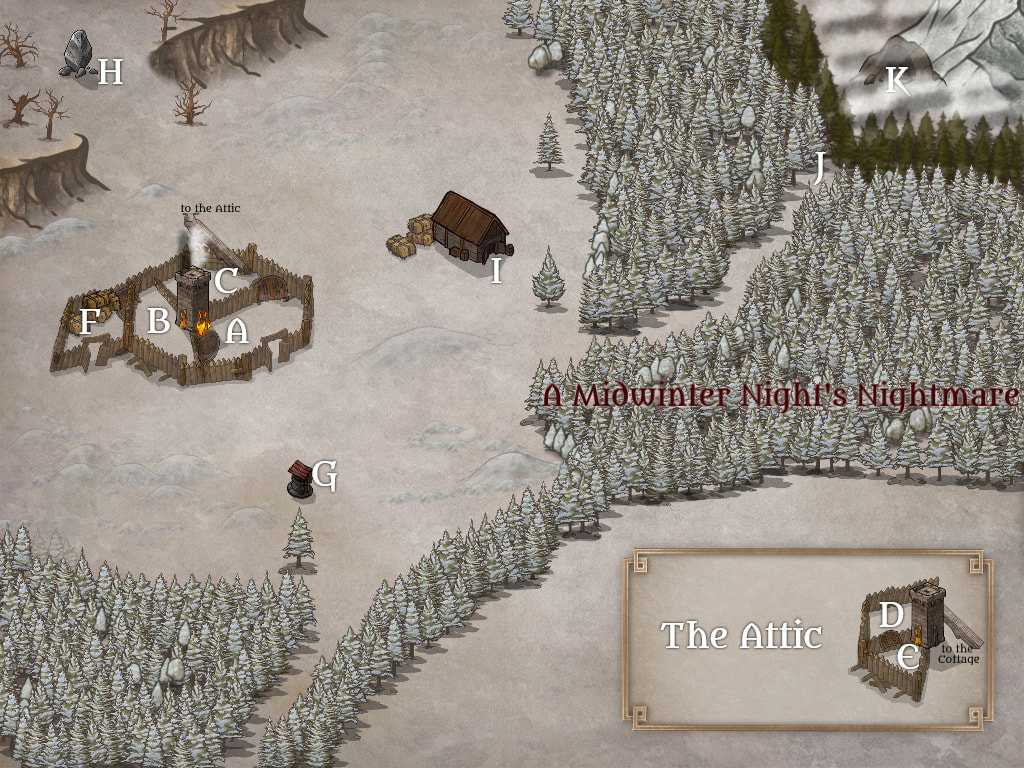 A. Hearth: There is a stone fireplace with an iron pot warming a stew nearby, a solid oak table and five chairs, a workbench with chopping boards and 3 sharp knives. Rabbits and plucked birds hang from the rafters along with onions, radishes and beets. The family gather here. A big iron poker hangs over the fireplace, etched with runes (detected on a Search roll): it is the shaft of Vadim’s father’s spear Snowmaiden, which he dismantled when he settled down and gave up adventuring. On the wall hangs Vadim’s bow and a quiver of 20 arrows. Furniture can be boarded against the windows, forcing invaders to spend a round breaking through, during which time they can be attacked at +2. B. Parlour: The fireplace warms this room too. There is a bench with cushions for the children and a spinning wheel beside a big bucket of yarn. The distaff used for weaving belonged to Vasilisa’s mother who was reputed to be a witch; anyone examining it will notice the arcane symbols on it but Vasilisa does not understand that this is the Witchhazel Wand. Her mother used to weave in here but died last spring. Windows can be boarded up as in A. A door leads to the Byre (F). C. Bedroom: The parents sleep here, with warmth from the fireplace. There is a single big bed with cords knotted tight to support a down-filled mattress. There is a bag of 214 silver pieces under the bed: Vadim’s savings. Vasilisa has a box of jewellery (value 20gp) and some cosmetics and perfume (value 5gp). An embroidered sign on the wall (by Grandmother Babushka) states: “Blade baptized / In Winter’s Breath / Wand and Ring / Bring Winter’s Death.” Windows can be boarded up as in A. A ladder leads to the Nursery (D). D. Nursery: The children sleep and play up here, although Ivan often sleeps in the Byre (F). There’s a box of dolls and carved wooden toys, including a snowglobe taken from the Kurgan (K) by Nikita who secretly plays with it when frightened at night. Mikul’s picture book shows grandfather Dadushka fighting the two Winterfiends, Korschei and Borschei, with his fiery spear and then sealing them away in a house under a hill. E. Babushka’s Room: Since Babushka died, her room has been closed up, but Mikul sometimes sneaks in here because he misses his grandmother. There is a narrow cot and a book of ancient runes : the Zagorvor. It appears to contain nonsensical gibberish in a cramped handwriting. F. The Byre: This lean-too houses Polkan the draft house, Camcha the cow and the ferocious rooster Gorky who attacks anyone except Ivan, pecking for 1 point of damage whenever their back is turned. Ivan can drive him into the coop with the chickens using a broom. Several tools hang from hooks, including a scythe and a sharp awl that is really the blade from Snowmaiden (see 1). Ivan likes to sleep here to get away from his siblings. G. The Well: This is frozen over but there is a mallet to break the ice and a bucket to lower in. If the ice is broken, the steam from the warmer water below can baptise Snowmaiden. H. Babushka’s Grave: Marked by a single stone, as she wished. Babushka’s body, which takes an hour to disinter, wears the Rowan Ring. I. The Timberstore: A ragged vagrant sleeps here, unknown to Vadim and his wife. Nikita knows he is here and sometimes brings him out buttered bread to eat or milk to drink; in return, he takes her up to the Kurgan (K) to look for trinkets and they found the snowglobe in the doorway. He is Morozko, a peddler, turned away by Vasilisa. J. Holly Hedge: a trail winds up the hill to the Kurgan, passing through a dense wall of holly. At night, the holly hedge blocks the path unless magic is used to part it. K. The Kurgan: An old burial mound whose stone door has fallen away from the hinges. At night, an eerie light shines out and the Krampus is here along with sleeping prisoners. If the snowglobe is returned here, the curse is broken. 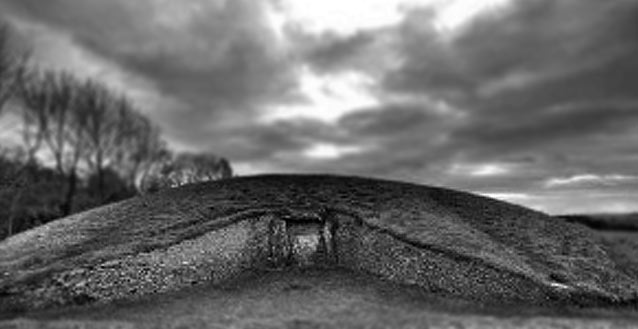 Encounters each hour Roll 1d10 for an event every hour. There are 10 events in total and when all have occurred, the Krampus will arrive in person. Each event only occurs once except for 1 and 2, which can occur twice.
Reactions after each Encounter After each event, the NPCs will react in various ways: roll 1d8. If a reaction affects a NPC who has been killed or captured, re-roll. PCs never see a NPC leave unless they are personally guarding them, in which case they will notice their departure immediately and, if they pursue them, are considered to be at their location when the next Encounter begins.
Key Items THE SNOWMAIDEN SPEAR Snegurochka or ‘Snowmaiden’ is the magic spear that Vadim’s father Dadushka used to defeat the Winterfiends decades ago. It has been split into its iron shaft (the poker in A) and blade (the awl in F) which can be reassembled to make a +1 magic spear. If Snowmaiden is ‘baptised’ in winter breath (steam from the well or the blood of dead white wolves), the spear’s full powers activate: magical +2, immunity to cold/blizzards, able to cut through the holly hedge surrounding the Kurgan (K) and Krampus cannot regenerate its damage. THE WITCHHAZEL WAND The Wand was the possession of Vasilisa’s mother Babushka and protected the Cottage until her death. Vasilisa has been using it as a distaff. It can be used to create a circle of protection in a 2’ radius of the bearer that cannot be entered by Elfs, Winterfields or the Krampus; it guides unerringly through the blizzard. If used with the Rowan Ring, it can cancel the blizzard, open the holly hedge (J) and allows the bearer to turn the Krampus (D&D: as a 4th level Cleric; Forge: spend 12SPTS, 30% success). THE BOOK OF ZAGOVOR Babushka’s spellbook is incomprehensible gibberish to other readers, but it will fall open at an important page for Mikul or be found at that page after the event of ‘footsteps in the bedroom’. This page explains in detail how to baptise the Snowmaiden, wield the Witchazel Wand and Rowan Ring and how to pass through the holly hedge (J) into the Kurgen (K). Key NPCs
VASILISA: the Mother
D&D: 3 Hit Points, AC as unarmoured, attack with kitchen knives or scissors for 1d3, Lawful Good; Forge: 12HP, DV1 1, DV2 0, attack for 1d3, ST 11+. SPD 3 Vasilisa was raised by her witch mother to be intensely superstitious and goes in dread of the tall, bald hill in the forest known as the Kurgan. She misses her mother greatly and has preserved her room untouched, but she has one of her grandmother’s magical skill. She does not realise the distaff in B is a wand but recalls Babushka’s Rowan Ring which was buried with her outside. However, her love for her children is such that, if any are kidnapped, she will acquire the ability to use the Rowan Wand. VADIM: the Father D&D: 5 Hit Points, AC as leather, with cudgel for 1d6, Lawful Neutral; Forge: 15HP, DV1 2, DV2 2, 20AP, attack for 1d6, ST 10+. SPD 3 Vadim is the son of an adventurer, Dadushka, who gave up adventuring and dismantled his magical spear Snowmaiden. Vadim does not believe the old tales of his father wielding a magic spear but can identify the iron shaft in A as being from Snowmaiden. If Vadim’s children or wife are lost, his steely heritage will assert itself; he acquires +1 to hit and damage and will remember that the awl in F is the blade to Snowmaiden. IVAN: the elder son D&D: 3 Hit Points, AC as unarmoured, attack with broom for 1d3, Chaotic Good; Forge: 10HP, DV1 1, DV2 0, attack for 1d3, ST 12+. SPD 3 Ivan is a sullen teenager who is impatient with his siblings and angry with his parents. He has much of his grandfather Dadushka in him and likes to handle Snowmaiden’s blade (F): he senses it is magical but does not know it fits the poker in A. He knows that Nikita often sneaks away to the Timberstore (I) where she has an imaginary friend. He knows that Mikul is always sneaking into Babushka’s room (E). However, getting him to open up is not easy. He will idolise a strong stern warrior or an attractive, courageous woman among the PCs. MIKUL: the younger son D&D: 2 Hit Points, AC as unarmoured, no attacks, Neutral Good; Forge: 8HP, DV1 1, DV2 0, attack for 1d2, ST 14+. SPD 2 Mikul is 10 years old and was very close to his grandmother, who taught him much witch wisdom and gifted him the storybook in the Nursery (D). He has enough raw magical talent to use the Witchhazel Wand, knows that the distaff was Babushka’s wand and knows too that Babushka was buried with her magical ring. However, he will never speak of these things in front of his mother, because she scolds him out of superstitious dread. He knows that an odd man is living in the Timberstore (I) that Nikita calls ‘Mr Frost’. NIKITA: the youngest daughter D&D: 1 Hit Point, AC as unarmoured, half normal movement, no attacks, Neutral Good; Forge: 6HP, DV1 1, DV2 0, attack for 1, ST 15+. SPD 1 Nikita is 5 years old, with her grandmother’s fey and independent spirit and her grandfather’s boldness. She takes cakes and milk out to Morozko (‘Mr Frost’) but doesn’t speak of him around her parents. Morozko offered her a gift, which she refused, so he took her instead up to the Kurgan one morning and she fund the snowglobe there and brought it home. She keeps it secret and plays with it whenever she is distressed. MOROZKO (Mr Frost): peddler D&D: 4 hit points, AC as leather, attack with sling for 1d3, True Neutral; Forge: 16HP, DV1 2, DV2 1, 10AP, Sling for 1d3, ST 6+. SPD 4 A filthy tramp with verminous beard and hair, yellow teeth and rheumy eyes, Morozko wears a tattered red shirt and trews with an ermine trim that was once fine. He prattles nonsensically about the weather, his sisters the stars, the old warrior in the Byre, the cannibal twins and the wisdom of children; he has the ability to scold characters about their deep anxieties (Vadim that he is unworthy of his grandfather, Vasilisa that she does not protect her children from evil, Ivan that he will never amount to anything, the PCs on whatever weaknesses the Referee decides are appropriate). Morozko carries a sack with magical properties: although it appears empty, he can draw from it a gift for anyone who has shown him kindness or respect. Use this brief table or roll on an expanded table such as https://basalt-dnd.tumblr.com/post/153238499847/random-trinket-table
|
30 Minute Dungeons
Essays on Forge
FORGE Reviews
OSR REVIEWS
White Box
THROUGH THE Hedgerow

Fen Orc
I'm a teacher and a writer and I love board games and RPGs. I got into D&D back in the '70s with Eric Holmes' 'Blue Book' set and I've started writing my own OSR-inspired games - as well as fantasy and supernatural fiction.. 


Archives
April 2024
Categories
All
|


 RSS Feed
